Abstract: A detailed technical description of how to calculate cognitive complexity using Understand’s API and why the cognitive complexity metric could be important to you. There is now a plugin to generate the metric within Understand that can be downloaded here.
I’ve recently been looking into metrics that relate to technical debt and found Sonar’s Cognitive Complexity metric. The idea behind cognitive complexity is to give a measure of how hard code is to understand in contrast to cyclomatic complexity which measures how hard code is to test.
Cognitive Complexity
The Cognitive Complexity paper uses two examples to demonstrate the use case.
int sumOfPrimes(int max)
{
  int total = 0;
  OUT: for (int i = 1; i <= max; ++i) {
    for (int j = 2; j < i; ++j) {
      if (i %j == 0)
        goto OUT;
    }
    total += i;
  }
  return total;
}

char* getWords(int number) {
  switch (number) {
    case 1:
      return "one";
    case 2:
      return "a couple";
    case 3:
      return "a few";
    default:
      return "lots";
  }
}
Cyclomatic complexity is the sum of decision points plus 1. Both sumOfPrimes() and getWords() have a cyclomatic complexity of 4. The sumOfPrimes function has three decision points (outer for loop, inner for loop, and if statement) and getWords has three case statement decision points. However, the sumOfPrimes() function is harder to understand than getWords() and the goal of cognitive complexity is to show that.
Like cyclomatic complexity, cognitive complexity considers the number of decision points. However, it’s closer to modified cyclomatic complexity since it counts the switch statement as 1 instead of counting each case statement. It also starts from 0 instead of 1 to avoid penalizing lots of small methods with good names. Finally, cognitive complexity adds a penalty for nesting.
So, sumOfPrimes() cognitive complexity comes from the 3 decision points that also counted towards cyclomatic complexity, +1 for the nesting level of the inner for loop, +2 for the nesting level of the if statement, and +1 for the goto, totaling 7. The getWords() function has a cognitive complexity of 1, from the switch statement.
Since Understand supports metric plugins, I can write a plugin to add the cognitive complexity metric to Understand. I’ll create a plugin that works for C/C++ functions. You can find the plugin here. The rest of this article is a technical description of how to use our API to calculate the metric. For great details about the control flow graph and the lexer, read on. Or, if you want some custom scripts but don’t want to write them yourselves, check out this link.
Control Flow Graphs
Like cyclomatic complexity, cognitive complexity increases for certain code structures like loops and conditionals. In Understand, the easiest way to find these decision points is using the control flow graph. Before diving into the API for the control flow graph, let’s look at the control flow graph from the GUI. I’ll use this short function:
void controlFlowDemo(bool condition)
{
  if (condition) {
    int x = 0, y = 1; int z = 2;
  }
}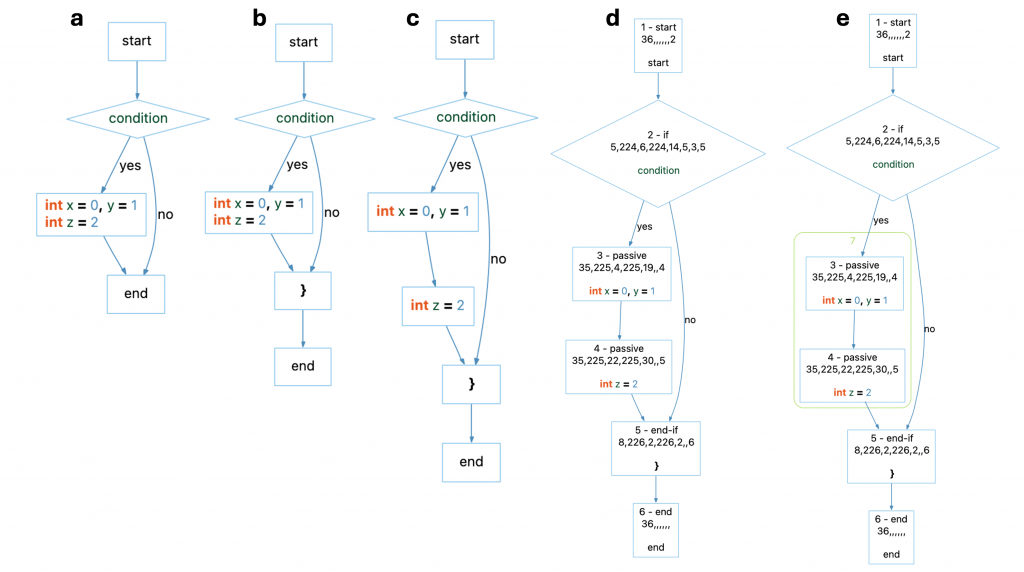
In the image above, part (a) shows the control flow graph as it appears by default in the GUI. However, when using the GUI control flow graph to understand the API control flow graph, it’s important to understand these options:
- The “Filter” option which is on by default hides nodes that most users wouldn’t care about such as the “end-if” nodes. Turning it off gives part (b) in the image above, revealing the “}” end-if node.
- The “Collapse” option, also on by default, combines adjacent passive nodes into a single node. Turning it off gives part (c) in the image above, showing that the two statements each get their own node.
- The “Debug” option, off by default, can be used to show additional information. Turning it on gives part (d) in the image above. The first number in every node is the 1-based index of the node. This is the order the nodes will appear in when returned from the control flow graph’s nodes() function. After the index is a string with the node kind. This is the same string returned from a control flow graph node’s kind() function. The string of numbers on the second line is the internal format of the control flow graph node and not relevant for most users.
- The “Cluster” option is off by default. Turning it on groups branches in a cluster box. These clusters are calculated by the display and not part of the actual graph.
Using Control Flow Graphs to Find Decision Points
We want to use the control flow graph to find the decision points that increment cognitive complexity. So, we need to loop over each node in the control flow graph and check the node’s kind(). For the “if” kind, a complete script using the Python API is:
import understand
import sys

db = understand.open(sys.argv[1])
ent = db.lookup(sys.argv[2], "function")[0]

cnt = 0
for node in ent.control_flow_graph().nodes():
  if node.kind() == "if":
    cnt +=1
print (cnt)
Understand supports control flow graphs for many of its languages. That means, for common structures like “if”, the above code will probably work as expected no matter what the language is. But it also means that not all node kinds exist in all languages. Since I’m not familiar enough with languages like Ada and Fortran to map the control flow graph structures to cognitive complexity, my script will be limited to C++.
Using the control_flow_by_language unofficial documentation attached below this paragraph, I know the only kinds I’ll encounter in a C++ function are: break, continue, do-while, else, end-do-while, end-if, end-loop, end-switch, end-try, goto, if, passive, return, switch, switch-case, switch-default, terminate, try, try-catch, try-finally, while-for.
So, I know the possible control flow graph kinds. Now I need to know which ones increase the cyclomatic complexity. I’ll summarize the information in Sonar’s cognitive complexity white paper, Appendix B in this table. The first column is structures that increment the cognitive complexity. The second column increases the nesting level, and the third column increments the cognitive complexity by the current nesting level.
| Category | Increment | Nesting Level | Nesting Penalty |
| if, ternary operator | X | X | X |
| else if, else | X | X | |
| switch | X | X | X |
| for, foreach | X | X | X |
| while, do while | X | X | X |
| catch | X | X | X |
| goto LABEL, break LABEL, continue LABEL, break NUMBER, continue NUMBER | X | ||
| sequences of binary logical operators | X | ||
| each method in a recursion cycle | X | ||
| nested methods and method like structures such as lambdas | X |
So, mapping the categories onto the control flow graph kinds used in C++, the following kinds increment the cyclomatic complexity and have a nesting penalty (where k is the node kind):
if k in ["if", "switch", "while-for", "do-while", "try-catch"]:
  complexity = complexity + 1 + nesting
The ternary operator is not part of the control flow graph. So, I’ll leave it and the last three rows for later. That leaves goto, else if, and else kinds that cause an increment without a nesting penalty. This assumes that the continue and break kinds do not increment the cognitive complexity because they aren’t followed by a label or a number.
The “else if” increment causes a problem. In C++, “else if” is an “else” node followed by an “if” node (not a single “elsif” node). If we increment for both “else” and “if” kinds the number will be too high. So we’ll increment for “else” nodes not followed by an “if” and rely on the “if” to increment “else if” statements.
elif k == "goto" or (k == "else" and nodes[i+1].kind() != "if"):
  complexity = complexity + 1
Using Control Flow Graphs to Find Nesting
In the code above, there’s a convenient “nesting” variable. How do we know what the nesting is? Understand’s control flow graphs include “end” nodes that can be used to show the range of the structure. So, a good start is incrementing the nesting if a node has an end_node, and decrementing it when an end is reached. This is similar to how the GUI control flow graphs calculates clusters when the “Cluster” option is turned on.
Else If Nesting
However, this simple approach is going to fail for “else if” statements. Recall that for “C++” and “else if” is an “else” node followed by an “if” node. Let’s look at an “else if” node with the GUI graph. For this code:
void elseIfs2(bool condition)
{
  if (condition) {

  } else if (condition) {

  }
}
The control flow graph is:

Notice that there are two “end-if” nodes, 7 and 8. Each “if” statement has its own end node even if it was preceded by an else. More important, the end-node for the first if, node 8, comes after both the “yes” and the “no” (else) branch have completely finished. So, the content of the “else if” branch, represented by passive node 6, is at a nesting level of 2. But from a cognitive complexity perspective, the nesting should only be at level 1.
So, we can’t use only end nodes to decrement the nesting. I’ll choose to always increment the nesting on an “if” statement which means I need to decrement the nesting on an “else” node that is followed by an “if” node. One other point before we move on from “else if” statements. The control flow graph for the above elseIfs2() code is indistinguishable from the control flow graph for this code:
void elseIfs3(bool condition)
{
  if (condition) {

  } else {
    if (condition) {}
  }
}
So, with this approach, I’m assuming that “else if” is a lot more common than “else { if(); }” and accepting that the value is going to be wrong for the second case.
Try Nesting
There is another structure that won’t work correctly with just end nodes. A try catch structure in Understand starts with the try and ends after the final catch. However, cognitive complexity only increments the nesting level for the catch statements.
So, one approach is to increment the nesting level at the “try-catch” node and let it decrement with the end of the try statement. But what if there are multiple catch statements? They’d appear nested inside each other and the decrement at the end of the try statement wouldn’t restore the nesting level correctly. Another obstacle is that “finally” blocks don’t increase the nesting level either.
Let’s look at a graph for some sample code.
void doSomething()
{
  try {

  } catch (int e) { // Outer catch 1
    try {

    } catch (...) { // Inner catch

    }
  } catch (...) { // Outer catch 2

  }
}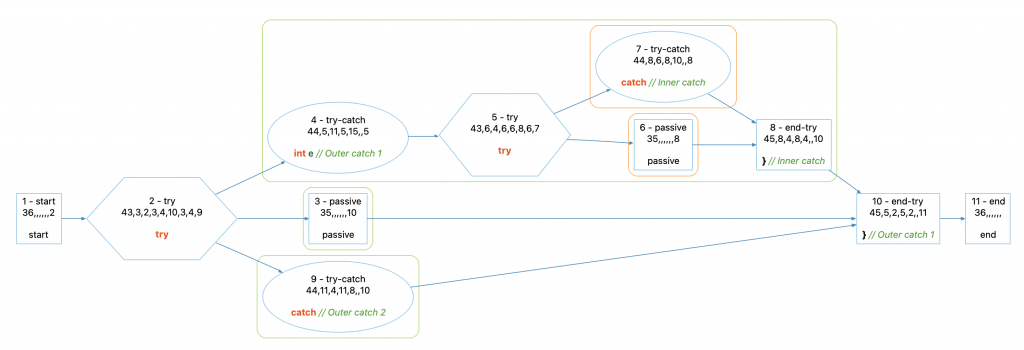
The GUI clusters are representing the desired nesting! The inner catch, node 7, is at nesting level 2 and the outer catches 4 and 9 are at nesting level 1. But the GUI didn’t use the end-node or else there’d be one green nesting level box instead of three. What the GUI actually does is start a cluster for each branch (child) of the try node that ends when the next branch starts.
So, the children of try node 2, in order, are 3, 4, and 9. The end node is 10. Put the children and the end node into a single list [3, 4, 9, 10], and loop over the the list from the first element to the second to last:
for i in range(len(list)-1):
  cluster_start = list[i]
  cluster_end = list[i+1]
Except, we don’t want to increase the nesting level for every child of the try. We only want to increase it for the children that are try-catch kinds.
Nesting Code
So, putting together “else if” and “try”, we need a way to track nodes that should “end” a nesting level whether or not they’re actually an “end-…” kind. I’ll track the ends in a set. Because a “try-catch” can both end the previous nesting level and begin a new nesting level, the end nesting code will be before the increment code. The complete nesting code is:
# End nesting levels
if nodes[i] in ends:
  nesting = nesting - 1

# Increments

# Increase nesting level
if k in ["if", "switch", "while-for", "do-while", "try-catch"] or (k == "else" and nodes[i+1].kind() != "if"):
  nesting = nesting + 1
  ends.add(nodes[i].end_node())
  if k == "if" and nodes[i].children()[1].kind() == "else":
    ends.add(nodes[i].children()[1])
if k == "try":
  children = nodes[i].children()
  children.append(nodes[i].end_node())
  for i in range(len(children) - 1):
    if children[i].kind() == "try-catch":
      ends.add(children[i+1])
Using the Lexer to Find Operators
As mentioned briefly above, the control flow graph doesn’t include the ternary operator. It also doesn’t include the binary operators “&&” and “||”. Since we need to count operators, we need to use a lexer.
Lexers
The lexer doesn’t have a graphical view in Understand like the control flow graph. But, there is still a helpful plugin to work with the lexer. You can install the tokenizer interactive report. Then select a function or a file entity and run the report to view the lexemes produced by the lexer. Here’s part the output for the control flow demo function above.

The first thing to notice in the output is the blue text. The blue text is an entity link, meaning that lexeme had an associated Understand entity (Lexeme.ent). The red text is the entity kind. It’s often followed, in green, by a reference kind (Lexeme.ref). Including Understand specific knowledge in the lexer means it takes longer to construct the lexer. So, one of the options when creating a lexer is whether to include the entities and references.
We’re not using entity and reference information so we could turn that option off. More important options to consider are whether the lexer includes inactive code or expands macros. From the cognitive complexity documentation, since preprocessor constructs count towards cognitive complexity, inactive code probably should be included. However, the control flow graph doesn’t include inactive code, so this cognitive complexity implementation isn’t going to either.
The last option on the lexer is the tab stop. Because we’ll be relating lexer location to control flow graph node locations (so we know the nesting for the ternary operators) we need to leave the tab stop at the default. Otherwise the column numbers might not be correct.
By the way, the options on the lexer are the reason control flow graph nodes don’t have a “text” function. It’s cleaner to have the user decide the lexer options than to try to pass all the options through to a “text” function on the node.
Finding Lexemes for a Control Flow Graph Node
For cognitive complexity, the ternary operator both increases the nesting level and has a nesting penalty. Since we’re calculating the nesting level with the control flow graph, that means we need to scan lexemes one control flow graph node at a time. That way we know our current nesting level.
It’s possible that lexer creation will fail and not all control flow graph nodes are associated with a location. So before looking up lexemes, we’ll need to test if we have a lexer and a node location. Note that lexers are created from file entities and we started with a function entity. Check out the plugin to see how to get the file from the entity’s definition reference. Then we can lookup the lexeme at the beginning of the node using lexer.lexeme() and iterate while the lexeme’s beginning line and column are before the node’s end line and column.
  if lexer and node.line_begin() and node.column_begin() and node.line_end() and node.column_end():
    lexeme = lexer.lexeme(node.line_begin(), node.column_begin())
    while lexeme and isBefore(lexeme, node):
Finding Ternary Operators
How do we know if a lexeme is a ternary operator? We can detect ternary operators by checking if the lexeme token is “Operator” and the if the text is “?”. So, inside our while loop:
      if lexeme.token() == "Operator":
        if lexeme.text() == '?':
If we find a ternary operator, we increment the complexity and add the nesting level. But, ternary operators also increase the nesting level. How do we tell if a ternary operator is nested? For example, consider these statements:
a ? 1 : ((x || b) ? y : z);
(a ? 1 : x) || (b ? y : z)
a ? 1 : x || b ? y : z;
The first is clearly nested and the second clearly isn’t. The third I honestly wasn’t sure so I had to compile it and check. But it turns out the third is evaluated the same as the first. So, a second ternary operator is nested unless parentheses indicate otherwise. We can track the parentheses nesting level with this code:
      if lexeme.token() == "Punctuation":
        if lexeme.text() == '(':
          parens = parens + 1
        elif lexeme.text() == ')':
          parens = parens - 1
A ternary operator ends when the current parentheses nesting level is below the parentheses nesting level the operator started at. So, in the second line of ternary operator samples, the parentheses nesting level is 1 at the first ternary operator and drops to 0 at the closing parentheses, ending that operator. I’ll track the parentheses nesting level when a ternary operator begins by pushing it onto a stack, and pop the stack when the parentheses level drops. Then the length of the stack is the current ternary nesting level.
      if lexeme.token() == "Punctuation":
        if lexeme.text() == '(':
          parens = parens + 1
        elif lexeme.text() == ')':
          parens = parens - 1
          while trinaryNesting and trinaryNesting[-1] > parens:
            del trinaryNesting[-1]
      if lexeme.token() == "Operator":
        if lexeme.text() == '?':
          complexity = complexity + 1 + nesting + len(trinaryNesting)
          trinaryNesting.append(parens)
Finding Binary Logical Operator Sequences
Remember the summary table of increments for cognitive complexity. It’s a long way up now. But, we’re finally finished with all but the final three rows of the table. The third to last row is binary logical operator sequences. In other words, sequences of “&&” and “||” operators.
We could actually get a count of binary operators by subtracting the cyclomatic complexity from the strict cyclomatic complexity since the difference between the two metrics is whether “&&” and “||” count. But, cognitive complexity discounts sequences of the same logical operator, so “a && b” and “a && b && c” both count as 1.
So, the major decision to make is when a “sequence” ends. The sample in the cognitive complexity documentation is:
if (a                         // + 1 for 'if'
    &&                        // + 1
    !(b && c));               // + 1
Was it that “!” operator that broke the sequence or the parentheses? Let’s assume that any operator breaks part the sequence. Then we track the last operator and increment as long as the current operator wasn’t the last operator.
    if lexeme.text() in ["&&", "||"] and lexeme.text() != lastOperator:
      complexity = complexity + 1
For our purposes, it’s worth noting that parentheses aren’t an operator. They’re punctuation, as seen when we tracked them for ternary operator nesting. But “,” is an operator. So, when function calls start mixing with logical operators, this is the result:
bool logicalOperatorsSequences3(bool a, bool b)
{
  return a && myFunc() && myFunc(a,             // + 1 (comma)
                                 b)
         && myFunc(a && b,                      // +1 (comma)
                   a && b) && (a && b) && !a    // +1 (not)
          && !(                                 // +1 (not)
            a && b);                            // +1 (end of node)
}
Recursion
The second to last increment for cognitive complexity is recursion. Detecting recursion in Understand is straightforward. We just need to get the call references for the entity and see if any of them are for the same entity:
def recursiveComplexity(ent):
  complexity = 0
  for ref in ent.refs("call", unique=True):
    if ref.ent() == ent:
      complexity = complexity + 1
But, cognitive complexity specifically mentions indirect recursion. We could continue expanding the call tree to any level, but call trees can get very large so it can take a long time to expand them. As an arbitrary design decision, I’ll only check for indirect recursion at 2 levels. So, for the following code sample, we’ll catch selfRecursive() and indirectRecursive() but not cycle().
void selfRecursive()
{
  selfRecursive();
}

void indirectRecursiveB();
void indirectRecursiveA()
{
  indirectRecursiveB();
}

void indirectRecursiveB()
{
  indirectRecursiveA();
}

void cycle3a();
void cycle3b() { cycle3a(); }
void cycle3c() { cycle3b(); }
void cycle3a() { cycle3c(); }
Going to the second level requires adding an inner loop to the loop of our metric calculation. Since the recursion is two methods big, it adds 2 instead of one:
  complexity = 0
  for ref in ent.refs("call", unique=True):
    if ref.ent() == ent:
      complexity = complexity + 1
    else:
      for childref in ref.ent().refs("call", unique=True):
        if childref.ent() == ent:
          complexity = complexity + 2
Nested Functions
The final piece of cognitive complexity is nested functions. In Understand, a nested function is an entity and the cyclomatic complexity for the parent does not include the cyclomatic complexity of the nested function. Instead, the nested function has its own control flow graph and cyclomatic complexity value. This also means that the parent control flow graph includes the entire nested function as a single passive node.
So, for this code:
void nestedFunction(bool x)
{
  auto mylambda = [x] (int z) { return x ? z : -z; }; // +1 ternary operator + 1 nesting
}
The control flow graph is:

Note that the GUI did some fancy work behind the scenes to replace the contents of the lambda function with a “…”. Because the “Allow Call Expansion” option is on (it’s off by default), the passive node is shown with a 3D box. Double clicking on it will show the control flow graph of the nested lambda function.
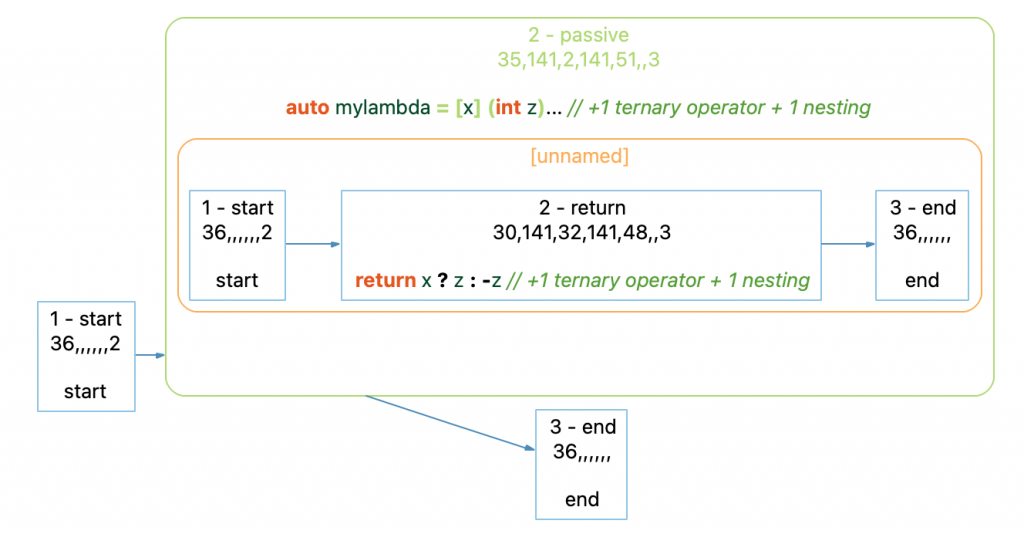
Unfortunately, our cognitive complexity metric is going to have to do the same fancy logic the GUI does to detect nested functions because cognitive complexity increases the nesting level for a nested function and counts the nested function’s cognitive complexity for the parent function.
The first step is detecting the lambda functions. We need to know the entity for the lambda function, where it starts, and where it ends. This code will return a list of tuples where each tuple contains the entity, the begin reference and the end reference.
def nestedFunctions(ent):
  nested = []
  for defRef in ent.refs("define", "c lambda function",True):
    endRefs = defRef.ent().refs("end", unique=False)
    beginRefs = defRef.ent().refs("begin",unique=False)
    if not beginRefs:
      beginRefs = defRef.ent().refs("definein, declarin body", unique=False)
    if defRef.ent().control_flow_graph() and len(endRefs) == 1 and len(beginRefs) == 1 and endRefs[0].file() == beginRefs[0].file():
      nested.append((defRef.ent(), beginRefs[0], endRefs[0]))
  return nested
Now, as we’re scanning lexemes, if we’re ever inside the range of a nested function, then we need to add the cognitive complexity of that nested function to the current amount and skip the lexemes that belong to the function:
childFunc = isChildFunction(lexeme, nestedFuncs)
if childFunc:
  complexity = complexity + cognitiveComplexity(childFunc[0], nesting + 1)
  lexeme = lexer.lexeme(childFunc[2].line(), childFunc[2].column())
  if lexeme:
    lexeme = lexeme.next()
The End
Yay, we finally made it to the end! This article described in technical detail how the cognitive complexity metric can be calculated from Understand’s API. But, if you made it this far, it’s worth reviewing the limitations:
- The metric plugin is only for C/C++. Extending it to other languages requires handling more control flow graph node kinds. It will probably also require updating the lexer code (to handle, for example, the word “and” instead of only handling “&&”). Also, the only nested functions currently detected are “c lambda functions”.
- Any “else” followed immediately by an “if” is assumed to be an “else if” which is not always correct.
- Sequences of operators are assumed to end at any operator token. It’s unclear if this is correct.
- Finally, a limitation not yet mentioned, preprocessor conditionals are not counted. The cognitive complexity metric examples count them, but Understand does not include inactive code in the control flow graph.
In case you missed it at the top, here’s a link to the complete plugin script. As always, check out our plugin repository for more great scripts or share your own.


